Easy & Delicious Salmon Sushi Bake Recipe

Table of Contents
Why Everyone Loves This Salmon Sushi Bake Recipe
If you love the flavors of sushi but want something easier to make at home—something warm, shareable, and unapologetically comforting—then this salmon sushi bake recipe is your new best friend. Imagine the savory, slightly sweet tang of sushi rice, a creamy, spicy salmon topping that mirrors the flavors of a spicy salmon roll, and the satisfying crunch of nori or toasted sesame on top. It’s sushi inspiration turned into a crowd-pleasing casserole: layered, baked, and scooped up with seaweed, rice crackers, or even salad. Simple? Yes. Stunning? Absolutely.
This dish is built on the best parts of sushi—seasoned rice, bold umami, and silky fish—but without the rolling or raw-fish intimidation. It’s ideal for potlucks, family dinners, date nights, or anyone who wants sushi vibes without sushi skills. In the age of viral recipes and comfort-fusion cuisine, the sushi bake has earned its fame for being accessible, flexible, and delicious. And in this article, I’ll walk you through everything: what a sushi bake is, the exact ingredients (in a clear table), the tools you’ll need, step-by-step instructions, expert tips, and variations like spicy salmon sushi bake or a crab-and-salmon combo.
Ready to dig in? Let’s start with the basics.
What Is a Sushi Bake?
A sushi bake takes the key elements of sushi and rearranges them into a layered, oven-baked dish. Instead of rolling rice and fillings into tight maki rolls, you layer seasoned sushi rice on the bottom of a baking dish and top it with a flavored seafood mixture—commonly a mayo-forward, spicy salmon or crab blend. The top gets a brief roast under the oven’s heat to develop a lightly caramelized, slightly crisp surface while keeping the interior creamy.
Think of it as a deconstructed sushi roll or a sushi-flavored casserole. It’s portable, forgiving, and highly customizable. Use real salmon for a luxurious finish, imitation crab for a budget option, or go vegetarian with grilled tofu and pickled vegetables. Because the components are cooked or oven-finished, sushi bake recipes are less intimidating for home cooks who prefer not to work with raw fish.
Why choose a sushi bake over traditional sushi? Three big reasons: approachability (no rolling), scalability (feeds many), and versatility (easy to adapt flavors). The salmon sushi bake variant, in particular, brings salmon’s rich, buttery profile together with creamy mayo, rice vinegar, and a touch of heat—giving you all the classic sushi flavors in one easy casserole.
Ingredients You’ll Need for This Salmon Sushi Bake Recipe
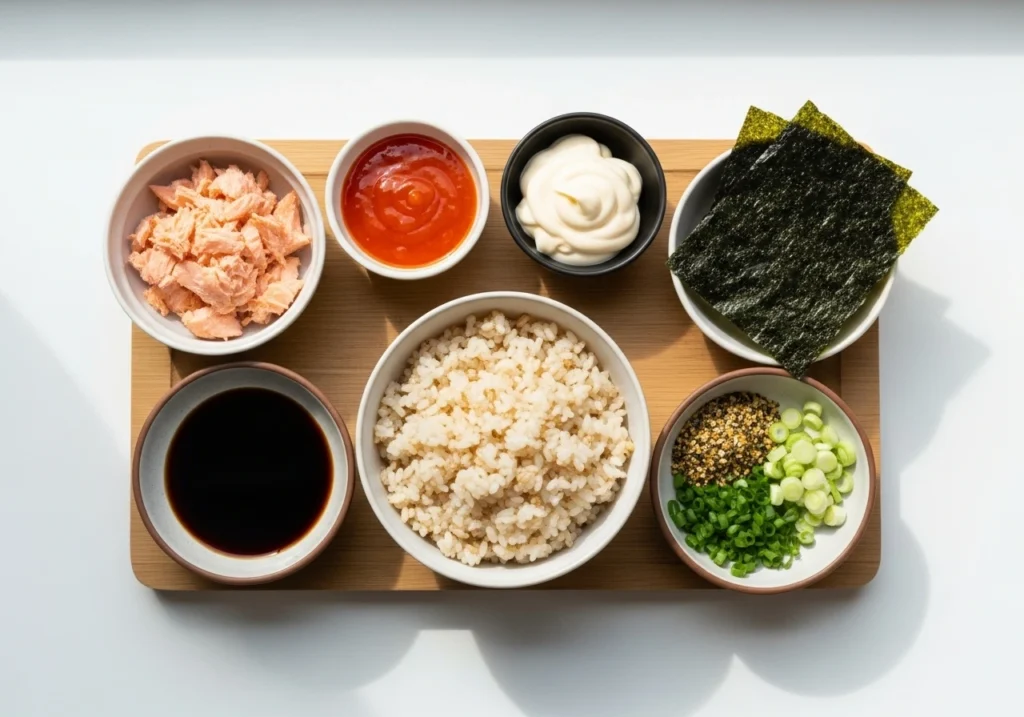
Below is a clear, SEO-friendly ingredient table so you can shop with confidence. These quantities are for a standard 9×9-inch baking dish that serves about 4–6 people. You can scale up for guests.
Ingredients Table
| Ingredient | Amount | Notes / Alternatives |
|---|---|---|
| Sushi rice (short-grain) | 2 cups (uncooked) | Rinse until water runs clear |
| Water (for rice) | 2 1/2 cups | Follow rice-cooker or stovetop ratio |
| Rice vinegar | 1/3 cup | Add 1–2 tbsp sugar + 1 tsp salt to make sushi vinegar |
| Sugar (for sushi vinegar) | 1–2 tbsp | Adjust to taste |
| Salt (for sushi vinegar) | 1 tsp | |
| Cooked salmon (flaked) | 12–14 oz | Baked or poached; canned salmon fine in a pinch |
| Kewpie mayonnaise (or regular mayo) | 3/4 cup | Kewpie gives a creamy, slightly sweet umami edge |
| Sriracha | 2–3 tbsp | Adjust for spice preference; use chili oil for milder heat |
| Soy sauce | 1 tbsp | Low-sodium if preferred |
| Furikake seasoning | 1–2 tbsp | Optional: for sprinkling and extra umami |
| Nori sheets | 4–6 sheets | For serving (or crumble on top) |
| Sesame seeds | 1 tbsp | Optional garnish |
| Green onions (thinly sliced) | 2 stalks | For garnish |
| Optional: avocado | 1 medium | Sliced for serving |
| Optional: imitation crab | 6 oz | For crab & salmon variation |
Make sure to use authentic sushi rice (short-grain) for that sticky texture that holds together when scooped. The rice vinegar mixture—sugar and salt dissolved into rice vinegar—is what turns plain rice into sushi rice; it’s a small step with a huge reward.
Kitchen Tools You’ll Need
Josh prefers tools listed in tables, so here they are. These are the essentials for a smooth, stress-free sushi bake recipe session.
Kitchen Tools Table
| Tool | Purpose |
|---|---|
| Rice cooker or heavy-bottomed pot | Cook perfect sushi rice consistently |
| 9×9-inch or 8×8-inch baking dish | Layer and bake the sushi casserole |
| Mixing bowls (two sizes) | One for rice, one for salmon mixture |
| Spatula / Rice paddle | For folding sushi vinegar into rice |
| Baking sheet (optional) | To catch drips or for broiling quickly |
| Fork or fish flaker | To break salmon into flakes |
| Measuring cups & spoons | Accurate seasoning |
| Aluminum foil | Optional: for resting or covering |
| Knife & cutting board | For garnishes like green onions and avocado |
Optional gadgets like a kitchen scale, microplane (for zesting citrus additions), or a small blowtorch (for finishing) can elevate presentation, but they’re not necessary.
How to Make Salmon Sushi Bake (Step-by-Step Guide)
Now we begin the hands-on portion of the recipe. In this first part we’ll cover preparing the rice and cooking/flaking the salmon, plus mixing the creamy topping. This part is crucial because good sushi bake starts with perfectly seasoned rice and a well-balanced salmon mixture.
Step 1 — Cook the Sushi Rice
- Rinse the rice: Put 2 cups of sushi rice in a bowl and fill with cold water. Swirl with your hand and pour off the cloudy water. Repeat 4–6 times until the water runs mostly clear. This removes surface starch and prevents rice from becoming gummy.
- Cook: Drain the rice and transfer to your rice cooker. Add 2 1/2 cups of water (adjust according to your cooker’s guidance). If using a pot, bring to a boil covered, then simmer on low for 15 minutes, remove from heat and rest covered for 10 minutes.
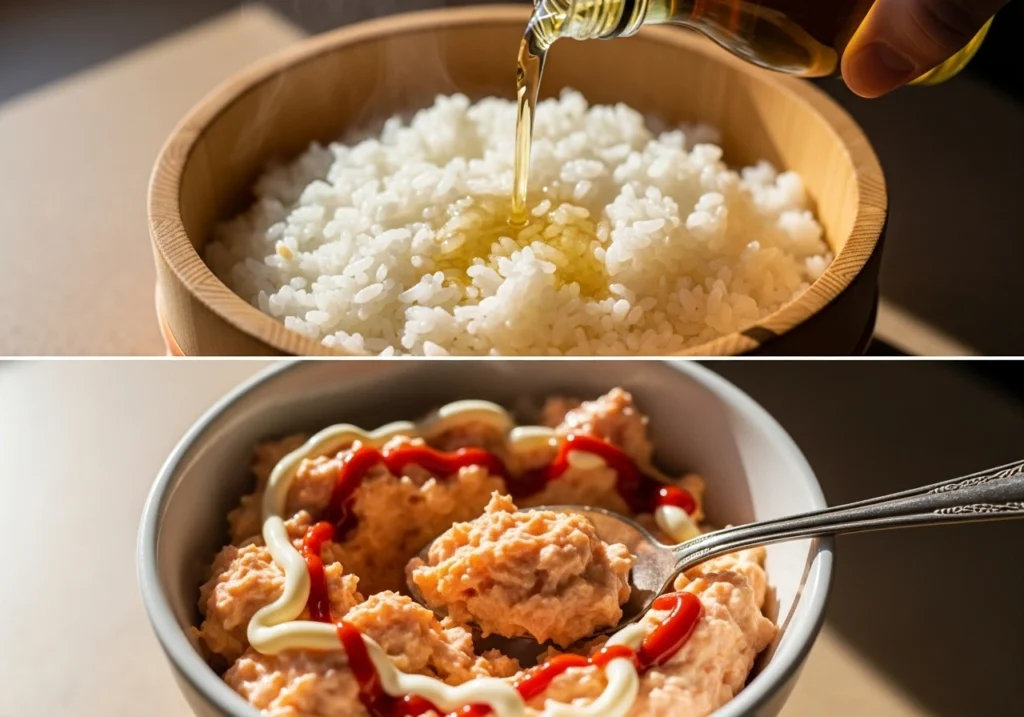
- Season: While the rice rests, warm 1/3 cup rice vinegar with 1–2 tablespoons sugar and 1 teaspoon salt until dissolved. Gently fold this sushi vinegar into the hot rice using a rice paddle or spatula—think gentle slicing and folding, not smashing. Spread the rice in a wide bowl to cool slightly; fanning helps create that glossy texture.
Tip: The rice should be slightly warm when you assemble the bake—warm enough to meld with the topping but not so hot it makes the mayo separate.
Step 2 — Cook and Flake the Salmon
Use fresh fillets or a pre-cooked option. For best flavor and texture:
- Oven-bake method: Preheat the oven to 200°C / 400°F. Season two 6–7 oz salmon fillets lightly with salt and a splash of soy sauce. Place on a lined sheet and bake for 10–12 minutes until just cooked through. Let rest; flake with a fork.
- Poaching method: Simmer salmon gently in a shallow pan with a cup of water and a splash of rice vinegar for 6–8 minutes until opaque.
- Canned or leftover salmon: Drain and flake—salmon sushi bake works great with canned wild salmon for convenience.
Flake the salmon into a mixing bowl and remove any big bones or tough sinew. You want tender, bite-size flakes for an even spread.
Step 3 — Make the Creamy Salmon Topping
This is the heart of the sushi bake—the creamy mixture that will be spread over the rice.
- Combine: In a medium bowl, mix 3/4 cup Kewpie mayonnaise with 2–3 tablespoons Sriracha (adjust for spice), 1 tablespoon soy sauce, and an optional squeeze of lemon or yuzu if you have it. This creates a balanced, slightly tangy, umami-rich base.
- Fold in salmon: Add the flaked salmon to the mayo mixture. Gently fold until the fish is evenly coated. If you like added texture, mix in 1/4 cup finely chopped imitation crab or 2 tablespoons furikake.
- Taste and adjust: This is crucial. Add more sriracha for heat, a pinch of sugar for balance, or a little more soy if you prefer saltier notes.
At this point, you have the two pillars of your sushi bake salmon: perfectly seasoned sushi rice and a luscious salmon topping. The next part (in the upcoming section) covers assembly, baking, garnishing, and serving — including presentation tips like making sushi bake cups, scooping strategies, and how to achieve a slightly crisped top without drying out the filling.
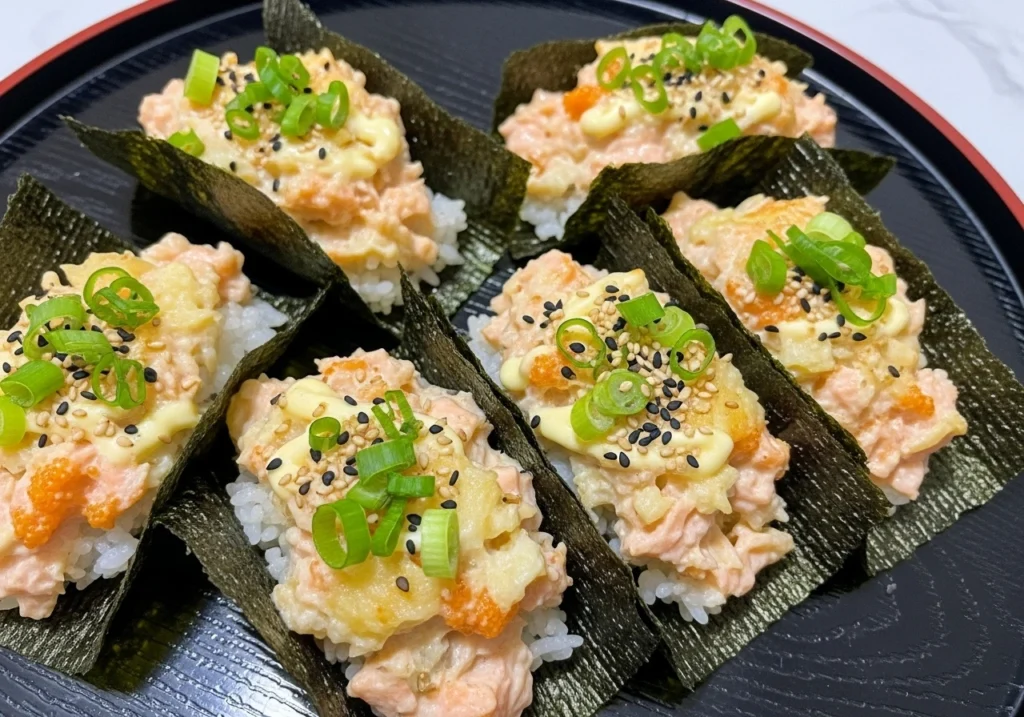
Step 4 — Assemble the Layers
Think of your baking dish as a sushi roll turned sideways. Each layer should complement the other: tangy rice on the bottom, rich salmon on top, and finishing garnishes for both flavor and texture.
- Prepare the baking dish: Lightly grease your 9×9-inch dish with a few drops of oil or a spritz of cooking spray to prevent sticking.
- Layer the rice: Gently spread your sushi rice evenly across the bottom. Use a spatula or rice paddle to press it down lightly—firm enough to create a base, but not so tight that it becomes dense.
- Add furikake: Sprinkle a generous layer of furikake seasoning over the rice. This adds a burst of umami, crunch, and a subtle seaweed flavor.
- Spread the salmon mixture: Evenly spoon the creamy salmon mixture over the rice layer. Use the back of your spoon to spread it from corner to corner, ensuring consistent thickness.
At this point, your casserole should look like a creamy, orange-tinted blanket sitting on top of glossy white rice. Resist the urge to bake too long; the goal is to warm and slightly brown the top, not to dry it out.
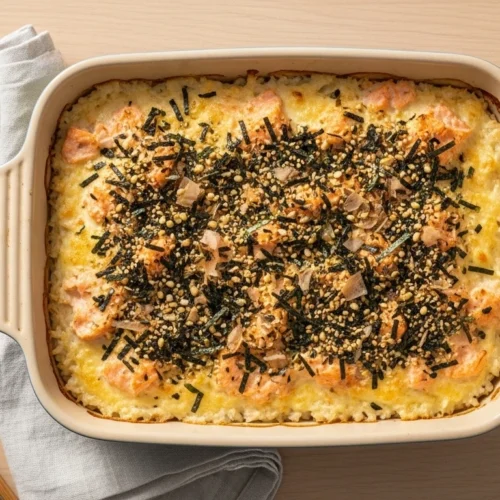
Step 5 — Bake the Sushi Casserole
- Preheat the oven: Set it to 400°F (200°C) if you haven’t already.
- Bake uncovered: Place your assembled dish on the center rack and bake for 10–12 minutes, or until the top begins to bubble slightly and the edges are golden.
- Optional broil finish: For that restaurant-style char, switch your oven to broil for the final 1–2 minutes. Keep a close eye on it—broilers can go from perfect to burnt in seconds.
The top should have light caramelization from the Kewpie mayo and a faintly smoky aroma. Once done, remove the dish from the oven and let it rest for 5–10 minutes before serving.
Expert Tips for the Best Sushi Bake Recipe
Even a simple salmon sushi bake recipe benefits from a few insider tricks. Here’s how to take your version from great to unforgettable:
- Don’t overmix the rice: Stir gently when adding vinegar to keep that slightly sticky, tender texture.
- Use fresh salmon if possible: Fresh salmon provides a naturally buttery flavor that makes every bite rich and satisfying.
- Balance the spice: Start mild with Sriracha and adjust after tasting the salmon mix—you can always add heat later with drizzles on top.
- Add a drizzle before serving: Combine mayo and Sriracha in a squeeze bottle for that signature zigzag sushi drizzle. It’s aesthetic and adds flavor layers.
- Try a topping torch: If you own a kitchen torch, lightly flame the surface for a toasty aroma and visual appeal.
Serving Ideas and Pairings
Part of what makes this dish a sensation is its versatility. You can serve sushi bake salmon in several fun, customizable ways that fit any mood or occasion.
1. Scoop and Serve
Scoop portions directly from the baking dish and serve over small squares of nori. It’s casual and interactive—guests can wrap the warm filling in seaweed like mini sushi tacos.
2. Make Sushi Bake Cups
Use muffin liners or small ramekins to bake individual portions. Perfect for parties or meal prepping; they look great and are easy to serve.
3. Serve with Sides
Complement your sushi bake with light accompaniments:
- Miso soup or clear broth
- Beet Salad with Feta and Balsamic
- Edamame sprinkled with sea salt
- Pickled ginger or radish slices for cleansing the palate
4. Creative Pairings
Feeling adventurous? Try pairing your salmon sushi bake with jasmine tea or sparkling water flavored with yuzu or lemon. It balances the richness beautifully.
Variations of Sushi Bake You’ll Love
One of the best parts of making sushi bake at home is how flexible it is. Once you master the core technique, you can experiment endlessly.
1. Spicy Salmon Sushi Bake
Add an extra tablespoon of Sriracha or a dash of chili oil to your salmon mixture. For a creamy heat kick, stir in a teaspoon of wasabi mayo before baking.
2. Crab and Salmon Sushi Bake
Mix equal parts flaked salmon and imitation crab (kani) before adding the mayo and Sriracha. This combination mimics the flavors of a California roll with a rich seafood twist.
3. Vegetarian Sushi Bake Recipe
Skip the salmon and substitute with diced avocado, sautéed mushrooms, or grilled tofu. Keep the same creamy base using vegan mayo and a hint of soy sauce for depth.
4. Low-Carb Sushi Bake
Replace sushi rice with cauliflower rice or quinoa seasoned with rice vinegar and a touch of sweetener. You’ll still get all the same sushi-inspired flavor with fewer carbs.
Storage and Reheating Tips
If you somehow manage to have leftovers (which is rare), storing your sushi bake recipe properly will keep it just as tasty for days.
- Refrigeration: Store leftovers in an airtight container in the fridge for up to 3 days.
- Reheating: Warm in the oven at 350°F (175°C) for 10 minutes, or microwave for 30–45 seconds.
- Avoid overcooking: Reheating too long can dry out the rice or curdle the mayo mixture, so gentle heat is best.
- Freezing: You can freeze portions in airtight containers for up to 1 month, though the texture of the rice may soften slightly upon thawing.
Pro tip: Sprinkle a little water over the rice before reheating to restore its original tenderness.
Frequently Asked Questions (FAQs)
1. Can I make salmon sushi bake ahead of time?
Yes, you can assemble the dish up to a day in advance, cover it tightly with plastic wrap, and refrigerate it. When you’re ready to serve, bake it straight from the fridge (add a few extra minutes to the baking time).
2. What’s the best type of salmon for this recipe?
Use boneless, skinless fillets of Atlantic or sockeye salmon. Fresh is ideal, but frozen or canned salmon works just fine—just ensure it’s drained well.
3. Can I use other fish?
Absolutely! You can substitute salmon with tuna, crab, shrimp, or even a mix. The creamy mayo base complements most seafood beautifully.
4. How long does sushi bake last in the fridge?
Up to 3 days when stored in an airtight container. Beyond that, the rice tends to harden and the mayo mixture loses its texture.
5. Can I make it spicy without Sriracha?
Yes, swap in chili flakes, hot sauce, or a dab of gochujang (Korean chili paste) for a unique twist.
Nutritional Information (Per Serving)
Here’s an approximate breakdown for one serving (assuming 6 servings total):
| Nutrient | Amount |
|---|---|
| Calories | 410 kcal |
| Protein | 23 g |
| Carbohydrates | 36 g |
| Fat | 18 g |
| Saturated Fat | 4 g |
| Sodium | 620 mg |
| Fiber | 1.5 g |
| Sugar | 4 g |
This sushi bake salmon is rich in protein and omega-3s, thanks to the salmon. Using light mayo or Greek yogurt can reduce calories while maintaining creaminess.
Conclusion – Your Go-To Sushi Bake Salmon Recipe
There you have it—an easy and delicious salmon sushi bake recipe that brings all the elegance of sushi into one effortless, comforting dish. Whether you’re feeding your family, impressing guests, or just craving Japanese-inspired flavors without the hassle of rolling sushi, this recipe delivers. It’s creamy, flavorful, and endlessly adaptable.
Try it once, and you might never crave takeout sushi again. The warmth, aroma, and taste of each scoop will keep you coming back for seconds (and maybe thirds).
So, grab your nori sheets, set out your spoons, and dive into this modern twist on a Japanese classic. And don’t forget to explore more dishes like my Old Fashioned Salmon Patties Recipe or the Anjappar Egg Fried Rice Recipe—perfect companions for this irresistible comfort food.
Easy & Delicious Salmon Sushi Bake Recipe
Ingredients
For the Sushi Rice
- 2 cups sushi rice uncooked
- 2 ½ cups water
- ¼ cup rice vinegar
- 2 tablespoons sugar
- 1 teaspoon salt
For the Salmon Layer
- 1 ½ lbs cooked salmon flaked
- ½ cup Kewpie mayonnaise
- 2 tablespoons sriracha
- 1 tablespoon soy sauce
- 1 tablespoon lemon juice
- 2 teaspoons sesame oil
- 2 chopped green onions
- ¼ cup softened cream cheese optional but recommended
For Assembling
- 3 tablespoons furikake seasoning
- Extra Kewpie mayo for drizzling
- Extra sriracha for drizzling
For Serving
- Roasted nori sheets
- Sliced cucumber
- Sliced avocado
- Green onions
- Extra furikake
Instructions
Prepare the Sushi Rice
- Rinse the sushi rice under cold water until the water runs clear.
- Add rice and water to a pot or rice cooker. Cook until fluffy.
- In a bowl, mix rice vinegar, sugar, and salt.
- Pour mixture over warm rice and fold gently. Let cool slightly.
Make the Salmon Mixture
- Flake your cooked salmon into a large bowl.
- Add Kewpie mayo, sriracha, soy sauce, lemon juice, sesame oil, cream cheese, and green onions.
- Mix until creamy and well-combined.
Assemble the Sushi Bake
- Preheat the oven to 400°F (200°C).
- Spread the sushi rice evenly into a 9×13 baking dish.
- Sprinkle a layer of furikake over the rice.
- Spoon the salmon mixture over the rice and spread evenly.
- Drizzle Kewpie mayo and sriracha on top.
- Bake for 12–15 minutes or until warm and lightly golden.
Serve
- Scoop a portion with a spoon.
- Wrap it with roasted nori sheets.
- Top with avocado, cucumber, and extra furikake if desired.
Notes
- You can substitute salmon with imitation crab or canned tuna.
- Add cream cheese to make it extra creamy.
- Spicy lovers: add more sriracha or chili crisp.
- Make it gluten-free by using tamari instead of soy sauce.
- Use day-old rice for firmer texture.
Review Our Recipe: Your Feedback Makes a Difference
There are no reviews yet. Be the first one to write one.